How to Increase NDI Bandwidth for High-res Images and Framerate
NDI® (Network Device Interface) is a free-to-use protocol to share a live video over a network. It can be used directly on video devices like cameras or with video sharing software. Since Newtek freely distributes its Software Development Kit (SDK), we saw an explosion of third-party software that integrated NDI capabilities.
Advantages and disadvantages of Using NDI in Domes
The main advantage of using NDI for planetariums is that you can stream live video from any computer connected to your local network using existing infrastructure.
The main disadvantage of NDI for dome applications is the limited bandwidth. It restrains the usage to a resolution of fulldome 4K at 30FPS (Frame Per Second) or at 2K for 60FPS.
NDI Converters Comparison Test
The Table1 below provides a starting point for analysis of popular NDI converters like Spout to NDI. I will explain the difference between GPU 3D and COPY below.

Table1: testing at 4096x4096 at 60FPS.
Can We Improve the Current NDI Conversion Efficiency?
After analyzing these results, I wondered if it's possible to increase the performance. That’s when I decided to take a closer look at NDI’s conversion process and here is a resume of my journey...
A Frame’s Video Path in a Traditional RGB to NDI Conversion
The drawing below represents the “traditional” NDI conversion of a single frame, from the GPU memory up to the final steps before the network card.
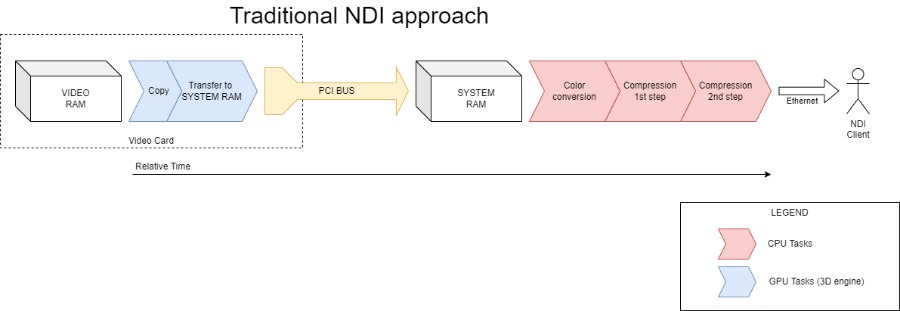
Figure1: The video path in a traditional RGB to NDI conversion.
Steps from left to right in chronological order:
- The GPU makes a copy of the frame.
- This copy is transferred into the system memory using the PCI bus.
- The frame in RGB is converted to YUV color space.
- A color compression reducing by 50% the image size.
- Final jpeg-like compression.
- Network transmission to the NDI client.
A Step-by-step Optimization
From experience, I know that steps 2-4 can be optimized but step 5 is done with Fast Fourier transforms which is already well optimized for the CPU.
Steps 3&4 are pixel-wise operations but the CPU is not optimized for this, the GPU is more efficient with thousands of parallel cores. Without color conversion and compression functions in DirectX or OpenGL, I decided to write my own functions.
Step 2 is limited by the PCI bandwidth. A single 4096x4096 RGBA texture will need approximately 4ms to be transferred, which represent 25% of the time between frames at 60FPS! Since the first compression step is now executed in the GPU, the frame becomes 50% smaller, making the transfer twice as fast.
Another optimization is possible but I need to explain the difference between the GPU 3D and COPY mentioned earlier. By default, all copy tasks are executed by the 3D engine. But using it to transfer large textures freezes your engine for a long 4ms. Another way is to use the COPY engine but transferring tasks to it is complex and almost impossible in DirectX11 and OpenGL. But luckily, I succeeded in this for another project (NestMap) and I was able to recycle my code for this test.
A Better NDI Approach
The graph below compares the original conversion steps with the new method proposed. The color conversion and the first compression are now included in the first copy step. The PCI bus transfer time is reduced by 50% and delayed to the COPY engine. The process’s time is now shorter and frees more valuable resources such as the CPU and GPU 3D.
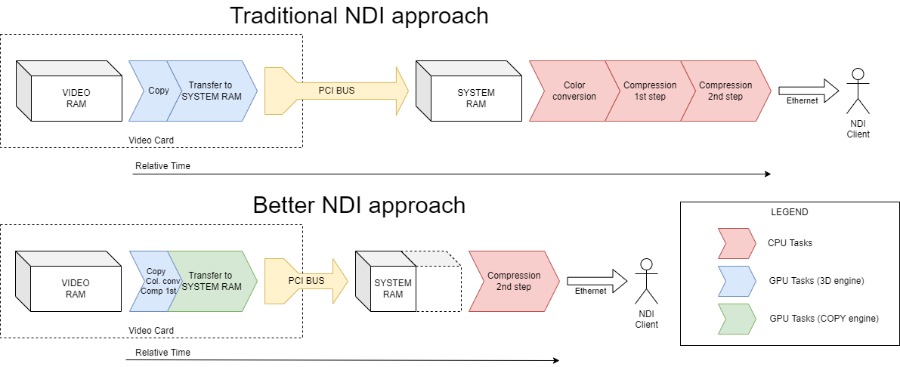
Figure2: Comparison of the original conversion steps with the new method proposed.
An Even Better NDI Approach
Should we stop here or should I push the optimization even further? Well, there is one more card left in my hand to play: Parallelisation. GPU and CPU tasks can be done in parallel but they must be kept synchronized and “thread-safe” to avoid being manipulated by two threads at once. This adds a lot of complexity but now each step owns a 16ms time window, which opens the door for higher resolutions.
So here is, in my opinion, the most optimized solution for a high-resolution converter from RGB frames to NDI®.

Figure3: Final comparison of the original conversion steps with the two new methods proposed.
NestNDI Comparison Tests
Are you as excited as I was to discover the results of the new NDI® approach suggested in this article? So finally, here are the results for the same Fulldome 4K@60fps as shown in Table1 with our converter NestNDI on the last line.
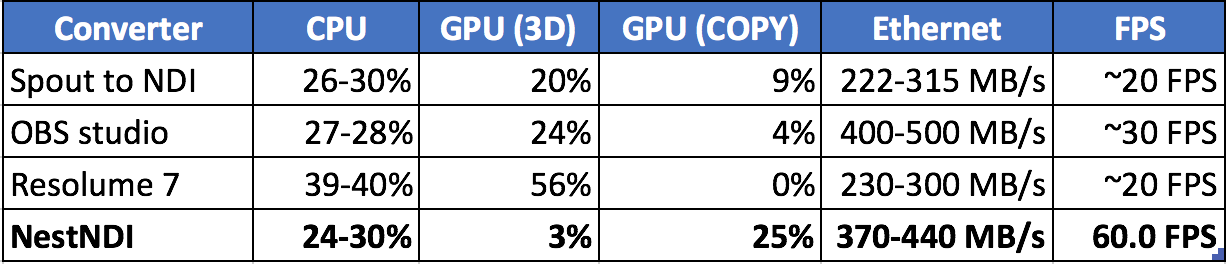
Table2: Testing at 4096x4096 at 60fps
Even if the CPU load looks the same as before, you have to note that it works now at twice the frame rate. Although it executes the first steps of color compression, GPU 3D load is now as low as 3%, since the PCI copy is done by the COPY engine. This leaves 97% to render very complex 3D scenes!
NestNDI Testing at 8192 x 8192 at 30 fps
Encouraged by the numbers, I did the same tests at Fulldome 8K! Here are the results.
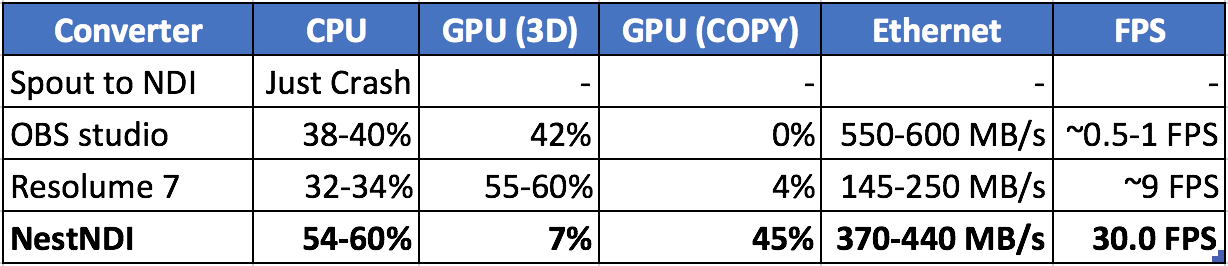
Table3: Testing at 8192x8192 at 30fps
I also tested at Fulldome 8K at 60fps with the same computer: the CPU topped at 100%, the Ethernet 1G was topped too and the real frame rate fluctuated between 58-59fps. But I tested on another computer, with a faster CPU with a 2.5Gb Ethernet connection, and I finally obtained 60fps for a fulldome 8K!
What does NestNDI mean for the dome community?
I do not doubt that this new method will be a game-changer for immersive domes. The low material cost and the flexibility of NDI® create a wide-open door to new possibilities. NDI® is already implemented in some dome software, including Digistar 7. Here is what Jason Fletcher of the Charles Hayden Planetarium had to say about NestNDI:

If you would like to try the method described above, here is a link to our NestNDI converter.
If you have questions or comments about this article, feel free to contact me directly.
Have you liked this post? Subscribe to FDDB Newsletter
Related news
chris Hill
News
FullDome World – please vote! Education FOR THE WIN!
SlicedTomato Productions invites the fulldome community to check out FullDome For the Win!

Ondrej Kamensky
News
Fulldome Festival Brno 2024 – Show submissions
The show submissions to the Fulldome Festival Brno 2024 are now officially opened!
Fulldome Database
News
1st Montsec Workshop for Planetarium Operators and Live-show Designers
The 1st Montsec Workshop for Planetarium Operations and Live-show Designers is an event organized by Parc Astronomic Montsec. The workshop will take place from 9th to 13th of June 2014 in Spain and is oriented to planetarium people related to creation and development of live shows in the dome. The main topics which the event […]
Sign up now, it's free!