

[VIDEO] How to Use AI to Produce Fulldome Images for your Planetarium
This video shows how to use AI (Stable Diffusion) to produce fulldome images for your planetarium.
The power of AI applied to images is huge!
First steps to getting started
There are many online resources that will guide you through the installation of Stable Diffusion on your computer. The software can be installed on both Macs and PCs, although the installation process is quite different. The good news is the functionality will be the same regardless of your OS so the following references will work in any case. if you don't have a powerful computer, you can run the software on Google Colab.
Once you have everything installed and running, I suggest installing the RealisticVision model to your Stable Diffusion installation. Note you will need to restart SD to load the new model properly. After having tried a bunch of models, this is the one that will generate the most photorealistic output. However, feel free to experiment with other models to try all kinds of possibilities, from Anime to Cartoons, etc.
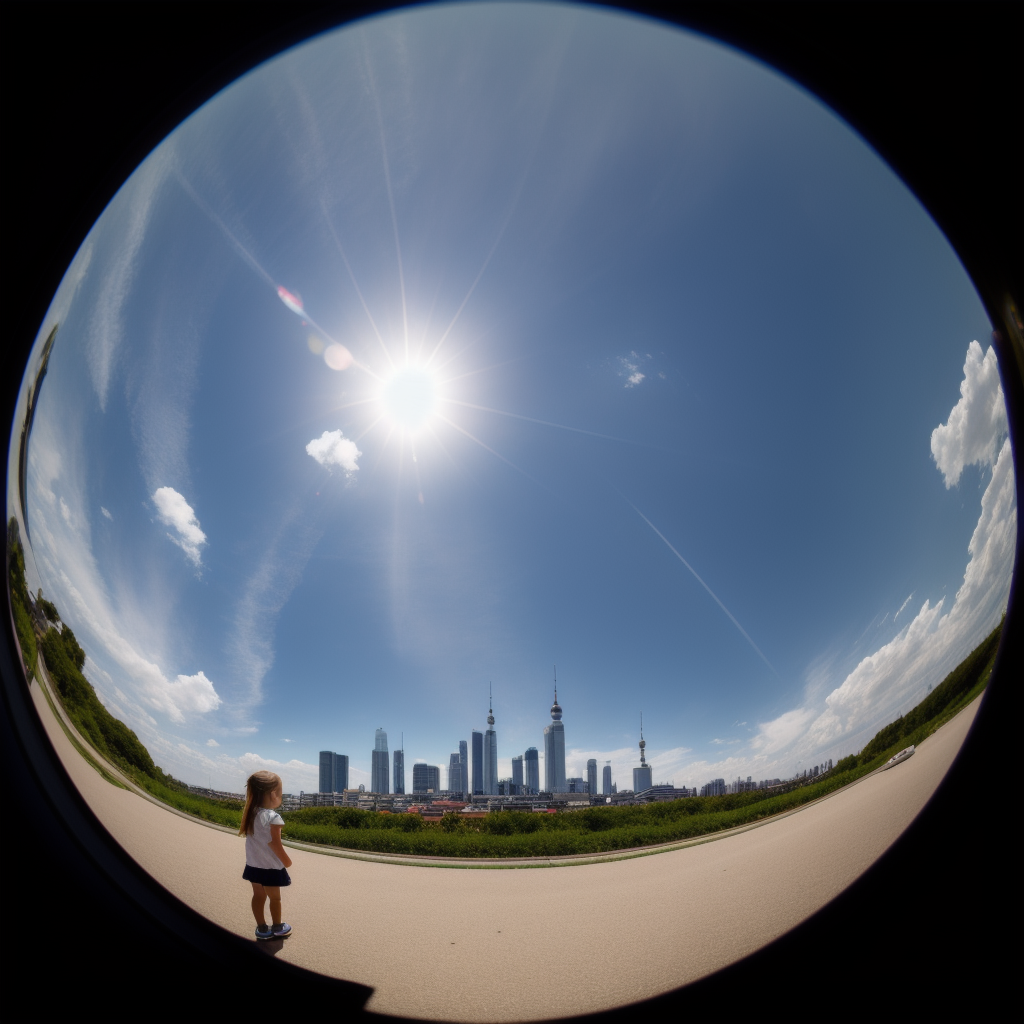
You're all set, it's now time to start playing with SD interface! In order to generate a good fisheye image, you will need to use the img2img tool which is available in the second tab. According to my experience, providing SD with a fisheye shot will help its AI to generate a better-looking new fisheye image. Describe what you would like to get in the 'Prompt' field, then specify what you don't want to get in the 'Negative Prompt' one. Below is an example of what I used:
- fisheye distorted photo of a german little girl, she is close to the camera, behind her there are skyscrapers, the sun is shining, and there are white clouds in the sky, wide angle photo, RAW photo, extremely detailed, hyperrealistic, hyperrealism, photorealistic, photorealism, dslr, soft lighting, high quality, film grain, Fujifilm XT3, backlighting, sharp focus, 8K, fisheye distorsion, circular image, bended horizon
- deformed iris, deformed pupils, mutilated, extra fingers, mutated hands, poorly drawn hands, poorly drawn face, mutation, deformed, blurry, dehydrated, bad anatomy, bad proportions, extra limbs, cloned face, disfigured, gross proportions, malformed limbs, missing arms, missing legs, extra arms, extra legs, fused fingers, too many fingers, long neck
Most of the parameters are self-explanatory, but here are a few that may be not so intuitive:
- Sampling steps: I get very good results at 25 steps, but you can play around with it;
- Sampling methods: this depends very much on the model your AI is using but, generally, 'Euler a' and 'DPM++ 2M Karras' works well;
- CFG scale: the more one increases this number, the more the software will use the given prompt to generate the new image; it's nice to play around with it to see what happens when you give some freedom to the AI; I usually like what happens with number 7!
- Seed: leave this to '–1' to use a random noise image to begin the process with; once you like a specific output you generated, write here the Seed Number of the generated image and the software will lock it and use it for the new processes.
Here is the output generated with the above descriptions, no other corrections applied. Well, have fun playing around with it!
Have you liked this post? Subscribe to FDDB Newsletter
Related news

Fulldome Database
News
Workshops and Lectures at the Russian Fulldome Festival 2015
As we have already mentioned in our previous articles, the 2nd edition of the Russian Fulldome Festival managed to appeal to many planetarians and laid a solid foundation for sharing valuable experience and creative ideas in the sphere of fulldome content. In this respect, lectures and workshops held under the planetarium roof were especially helpful […]

Fulldome Database
News
Call for Submissions, Wisdome Contest 2020
This is the call of submissions of fulldome content for Wisdome Contest 2020 to be held in Norrköping, Sweden, on May 25th, 2020.

Fulldome Database
News
New Fulldome Show: Cosmic Castaways
A new fulldome show was just added to the Fulldome Database, check it out: Cosmic Castaways by Ward Beecher Planetarium Info, trailer and full preview available.
Sign up now, it's free!